Python Installation Guide: Get, Set, Go Python!
- Team Holbos

- Sep 23, 2023
- 6 min read
Updated: Oct 26, 2023

Hello there! If you're here, you're about to embark on an exciting journey into the world of Python programming. Python is a versatile and beginner-friendly programming language that has gained popularity across various domains, including web development, data analysis, artificial intelligence, and more.
So, what exactly is Python? In simple terms, Python is like a language that allows you to communicate with computers. Much like how we use words and sentences to convey ideas, Python uses commands and instructions to tell the computer what to do. The beauty of Python lies in its readability and its similarity to everyday English, making it easy to understand and write code.
Before we dive into the wonderful world of Python, let's make sure you have everything you need. First and foremost, you'll need to have Python installed on your computer the installation process is straightforward, and we'll walk you through it.
Once Python is up and running, we'll start writing simple programs together. We'll begin with basic instructions, from the classic "Hello, World!" to creating small calculators. Step by step, we'll learn how to solve problems and build amazing things using Python.
Are you ready to begin? Great! Grab your enthusiasm and let's take our first step into this exciting journey of Python programming. Don't hesitate to ask questions and, most importantly, have fun coding !

What is Pycharm ?
PyCharm is like a super helper for people who want to write computer programs using the Python language. Imagine you're building a cool LEGO castle – you have all these colorful bricks, but you need a plan to put them together. PyCharm is your plan and guide for building amazing things with Python!
Here's how it helps: PyCharm is a computer program that you install on your computer, like a special toolbox. When you open PyCharm, it gives you a blank canvas (a place to start). You can write your Python code there, just like you'd draw a picture.
But PyCharm doesn't stop there – it's like having a smart friend who helps you find mistakes and suggests better ways to build your castle (or write your code). It underlines errors in red, so you know where to fix things. It even gives you hints and tips to make your code stronger and better.
You can organize your code neatly in PyCharm, just like arranging your LEGO bricks by color or size. It helps you keep everything in order, making it easier to find what you need when building your project.
PyCharm also knows a lot about Python and can give you ideas and shortcuts to speed up your work. It's like having a magical wizard by your side, making your Python journey much more fun and efficient !
In short, PyCharm is an awesome tool that makes writing and organizing Python programs easier and more enjoyable, whether you're a beginner or a coding wizard !
How to Install Pycharm on your PC/ Laptop

On Windows
PyCharm in Windows is like having a versatile toolbox filled with all the tools you need to create amazing things. Just as you set up a gaming world on your computer, installing PyCharm is similar.
It's like creating a world in Minecraft where you gather different tools and resources. Once you enter PyCharm, it's akin to navigating through a user-friendly gaming interface. Writing Python code in PyCharm is like crafting a unique gaming strategy, and PyCharm acts as your in-game guide, providing suggestions and correcting errors, much like a game advisor guiding you to win.
Let's get started with installation process now.

Step 1:- Download Pycharm
Visit the JetBrains Pycharm download page at :
Choose the version you'd like (Community or Professional) and click on the "Download" button for that version. Holbos recommends you to go for Community version for installation as its free of cost.

Step 2 :- Run the installer
Locate the downloaded file (typically in your Downloads folder) and double-click on it to run the installer.

Step 3 :- Select Installation Type
The installer will prompt you to choose the type of installation. Choose the "Custom" option if you want to customize the installation settings, or choose "Typical" for a standard installation.

Step 4:- Choose Components
If you selected the "Custom" installation, you'll be asked to choose components to install. Leave the default selections unless you have specific preferences.
Step 5 :- Choose Start Menu Folder
Select the Start Menu folder where you want PyCharm shortcuts to be placed and click "Next".

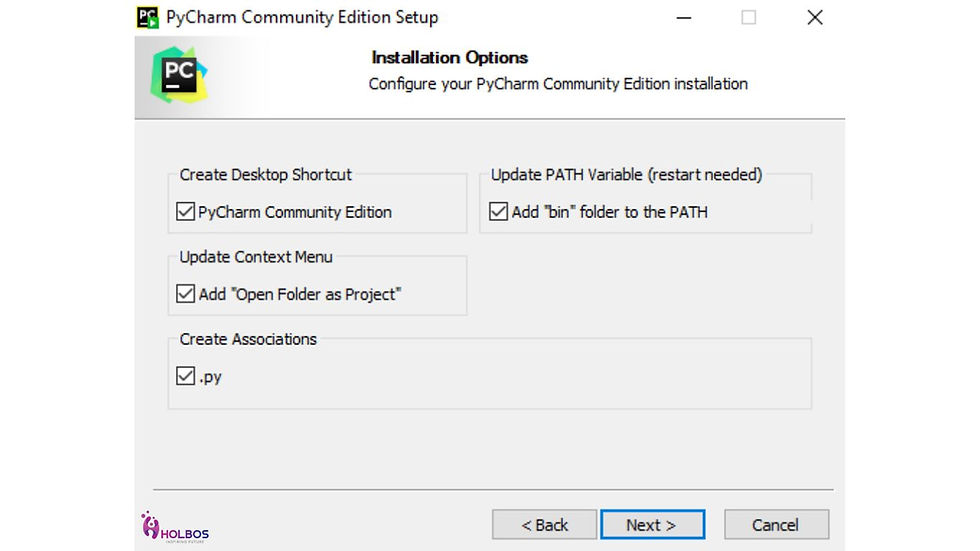
Step 6 :- Choose Installation Options
Select any additional options you prefer, such as creating associations for .py files, and then click "Next.
Step 7:- Choose UI Theme
Select the UI theme (Light or Dark) that you prefer and click "Next".

Step 8 :- Install
Review your selected settings and click "Install" to start the installation process. This might take a few minutes.

Step 9 :- Launch Pycharm
Once the installation is complete, you can choose to launch PyCharm immediately by leaving the "Launch PyCharm" option selected and clicking "Finish".

Step 10 :- Pycharm is Ready
If you've installed the Community version successfully. Now you're all set to start using PyCharm for your Python development!

On macOS
Imagine PyCharm on macOS as your sleek artist's studio, complete with high-quality art supplies. Installing it is as simple as downloading a new app on your iPad. When you open PyCharm, it's like stepping into a minimalist, well-lit studio.
Writing Python code in PyCharm is akin to creating digital art, with PyCharm acting as your artistic mentor, giving you tips and correcting your strokes, just like a skilled art teacher. It's like having a virtual canvas where your Python code turns into a beautiful masterpiece with PyCharm's guidance.
Mac OS, the operating system for Apple Mac computers, is renowned for its user-friendly experience and streamlined installation process. Installing software on macOS is often a seamless and straightforward process. One of the key reasons for this ease is the standardized software distribution format, primarily using DMG (Disk Image) and PKG (Installer Package) files.
Let's get started with installation process now.

Step 1:- Download Pycharm
Visit the JetBrains PyCharm download page at :
Choose the version you'd like (Community or Professional) and click on the "Download" button for that version.

Step 2:- Open DMG File
Once the download is complete, locate the downloaded .dmg file (typically in your Downloads folder) and double-click on it to open the PyCharm disk image.
Step 3:- Drag Pycharm to Applications
A new window will open showing the PyCharm application. Drag the PyCharm icon into the "Applications" folder to install PyCharm on your system.
Step 4:- Wait for Copying
The system will copy the PyCharm application to your Applications folder. This may take a few moments.

Step 5:- Launch Pycharm
Open your Applications folder and find PyCharm. Double-click on the PyCharm icon to launch the application.

Step 6:- Configure Pycharm
Upon launching PyCharm for the first time, you'll be asked to customize your settings and preferences, such as the theme, keymap, and plugins. Set these according to your preferences and click "Start using PyCharm" to begin.
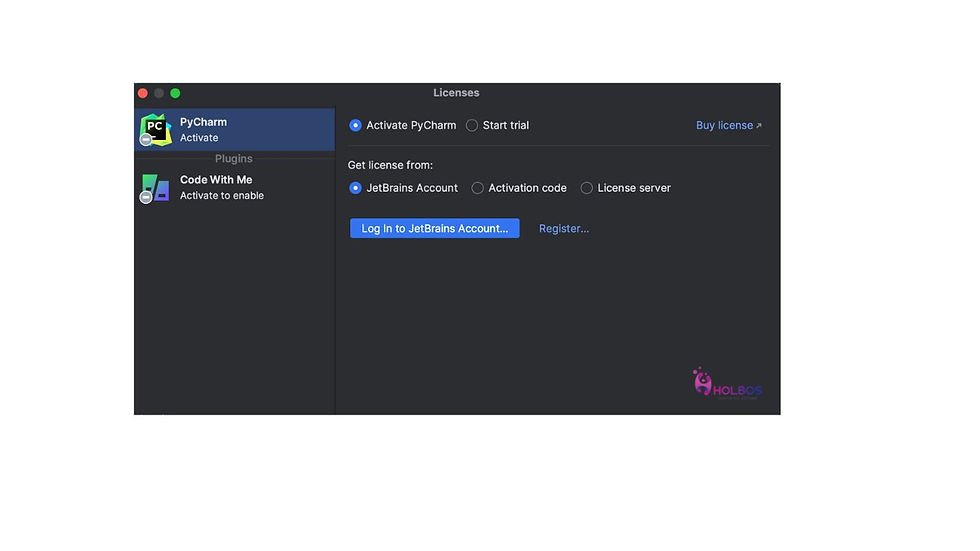
Step 7:- Activate License (Professional Version Only)
If you've installed the Professional version and have a license, you'll be prompted to enter your license details. If you selected the Community version, skip this step.
Now you have successfully installed PyCharm on your macOS and can start using it for Python development!

On Ubuntu
PyCharm on Ubuntu can be compared to a well-organized workshop with all the essential tools for crafting. Getting it is as easy as choosing tools from a magical shop. Opening PyCharm feels like entering a meticulously organized workshop.
Writing Python code is like crafting intricate wooden sculptures, and PyCharm plays the role of a seasoned craftsman, guiding you through the process and helping refine your work. It's like having a reliable toolkit that enhances your craftsmanship, making your Python projects stand out.
Ubuntu is a popular and user-friendly operating system based on the Linux kernel. It's known for its ease of use, versatility, and being an open-source solution.
Let's see how Pycharm can be installed in Ubuntu.

Step 1:- Ubuntu Software Center
To open the Ubuntu Software Center, click on the Ubuntu button in the top left corner of the screen, and then select "Software".

Step 2:- Download Pycharm
Once you have found a software application that you want to install, click on its name to open its details page. The details page provides information about the software application, such as its description, screenshots, and user reviews. Here in our case we select Pycharm.

Step 3:- Selecting the Edition
Click on the "PyCharm Community Edition" or "PyCharm Professional Edition" icon, depending on which version you want to install.

Step 4 :- Installation
Click on "Install" button and enter your Password when prompted

Step 5:- Launch Pycharm
The Ubuntu Software Center will download and install PyCharm.Once the installation is complete, you can launch PyCharm by clicking on the "Launch" button.
Now you have successfully installed PyCharm on your Ubuntu system and can start using it for Python development!
Hello Folks, we have come to an end of the installation guide on setting up Pycharm framework for Python coding. We hope you are all set to go learning Python and enjoy the language.
If you have doubts about how to setup a roadmap to learn Python coding with an expert and get to know from scratch the techniques to master it signup with Holbos to know more about the course.
Click the button below to schedule a Trial Session with an expert Python Developer from Holbos.
Happy coding Kids !

Comments